macOS: The App-based system setup
Welcome to the Jungle [1]
The following is a set of scripts packaged as an app. It is designed to automate the AFNI installation steps. You should launch the script by double clicking the icon like a regular program.
- This app will download and install the recommended versions of the following:
Xcode command line tools
Xquartz
R
AFNI
If a package is already installed, you may be asked if you want to reinstall it. But you can skip it if you like. This script will also setup your ~/.cshrc, ~/.bashrc, and ~/.bash_profile. It will add the appropriate entries to your paths specified there. After completion, you should restart your computer just in case.
This is a BETA script, so your feedback is welcome. We have tested the app on 10.10 to 10.13 with various hardware.
If you are seeking the non-App version of install instructions, please see HERE.
Take the File and Run [2]
Break It Down Again [3]
Download the file and open it to extract or mount.
Read the README!!
Double click the “afni_macOS_install_10.7_BETA” or “afni_macOS_install_10.12_BETA” icon.
You may get a popup notification about an “unidentified developer”.
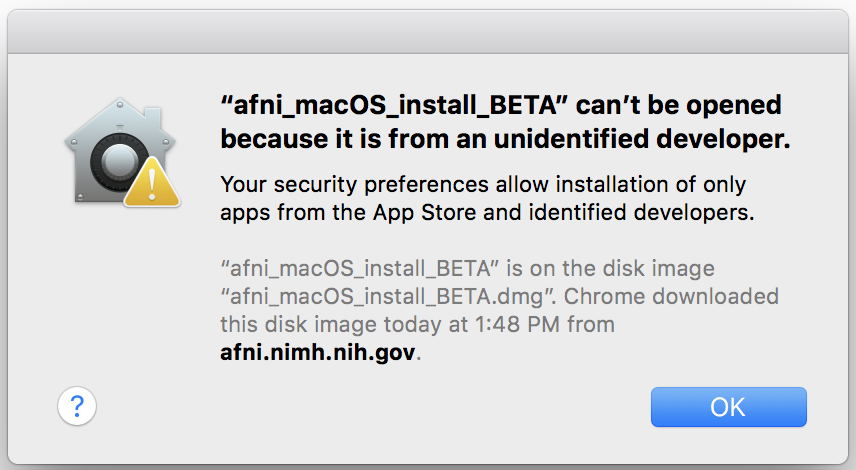
- If so, you can continue by:
Right click or control click the app icon.
Then click open from the shortcut menu.
(see here for more info: https://support.apple.com/kb/PH25088)
- This will launch your terminal.
Most of the rest of the interactions are in the terminal. If needed, the Xcode command line tools will popup an installation window. Once complete, return to the terminal to continue.
- To accept the default options (shown in [ ]), just press Enter.
For some sections, you may need to type in your password. If you are not an administrator on your computer, this installation may fail. Make sure you have permissions for the folder you choose for AFNI! The
sudoprompt will time out after awhile, so this is not an unattended install.
This script does not install fink. Nor does it download the class data.

The icon is a work in progress. If you have some design skills, please send me alternatives.
Install Netpbm
Copy+paste:
/bin/bash -c "$(curl -fsSL https://raw.githubusercontent.com/Homebrew/install/master/install.sh)"
Copy+paste:
brew install netpbm
Purpose: Install “netpbm”, which has functionality for converting
image formats (such as to PNG) and is used in several programs like
@snapshot_volreg, @chauffeur_afni and others. Uses the
package manager homebrew to do the installation.
Prepare for Bootcamp
The AFNI Bootcamp involves hands-on learning with processing and looking at data. The packages installed here include the data, handouts and useful “cheat sheets” of commands. The full download size is several GB, and you should leave at least 10 GB free on your computer after downloading+unpacking the data, to be able to run various examples.
Copy+paste (to download+upack Bootcamp data to your home directory):
cd
curl -O https://afni.nimh.nih.gov/pub/dist/edu/data/CD.tgz
tar xvzf CD.tgz
cd CD
tcsh s2.cp.files . ~
cd ..
Copy+paste (to download+upack data for investigating QC in FMRI):
cd
curl -O https://afni.nimh.nih.gov/pub/dist/edu/data/boot_qc/bootcamp_qc_sub_rest_A.tgz
curl -O https://afni.nimh.nih.gov/pub/dist/edu/data/boot_qc/bootcamp_qc_sub_rest_B.tgz
curl -O https://afni.nimh.nih.gov/pub/dist/edu/data/boot_qc/bootcamp_qc_sub_task_A.tgz
tar -xf bootcamp_qc_sub_task_A.tgz
tar -xf bootcamp_qc_sub_rest_A.tgz
tar -xf bootcamp_qc_sub_rest_B.tgz
If no errors occur in the above, and your
afni_system_check.pysays things are OK, you can delete/remove the tarred/zipped package, using:cd rm CD.tgz rm bootcamp_qc_sub_task_A.tgz rm bootcamp_qc_sub_rest_A.tgz rm bootcamp_qc_sub_rest_B.tgz
If you are confident in the downloads+unpacking, you can also deleted theCD/directory in the present location.- !Pro tip!: Bring a computer mouse to use at the Bootcamp. It is muuuuch easier to follow the demos that way.
Read+practice the handy Unix documentation/tutorial. This will give you a quick lesson/refresher on using basic Linux shell commands (e.g., ls, cd, less, etc.). It will greatly enhance your bootcamp experience– we promise!
Evaluate setup/system (important!)
Open a new terminal, and then copy+paste:
afni_system_check.py -check_all
- Read the “Please Fix” section at the end. If there are no suggestions, then rejoice! Otherwise, try the suggestion(s) there.
Open up the AFNI and SUMA GUIs, juuuust to make sure all is well:
afni
suma
Report any crashes or problems!
If stuck, then …
try searching online with the error message, and/or ask on the Message Board
send the system check to an AFNI guru for advice—copy+paste:
afni_system_check.py -check_all > out.ASC.txt
... and email the file “out.ASC.txt”.
Niceify terminal (optional, but goood)
To improve your life when using the terminal, copy+paste these:
echo 'set filec'    >> ~/.cshrc
echo 'set autolist' >> ~/.cshrc
echo 'set nobeep'   >> ~/.cshrc

echo 'alias ls ls -G'       >> ~/.cshrc
echo 'alias ll ls -lG'      >> ~/.cshrc
echo 'alias ltr ls -lGtr'   >> ~/.cshrc
echo 'alias ls="ls -G"'     >> ~/.bashrc
echo 'alias ll="ls -lG"'    >> ~/.bashrc
echo 'alias ltr="ls -lGtr"' >> ~/.bashrc
echo 'alias ls="ls -G"'     >> ~/.zshrc
echo 'alias ll="ls -lG"'    >> ~/.zshrc
echo 'alias ltr="ls -lGtr"' >> ~/.zshrc
Purpose: The first command block sets up tab autocompletion
for tcsh (which should already be enabled for bash users by
default). The second set of commands make aliases for the main shells
so that different types of files (“normal” files, zipped files,
executables, et al.) and directories are shown using different colors
and boldness. It makes it much easier to navigate on a terminal,
IMHO.
Keep up-to-date (remember!)
To update your AFNI sometime, copy+paste:
@update.afni.binaries -d
That’s it!!
Purpose: This will automatically download the correct, latest AFNI version to your computer, replacing your old binaries. It will also update the
apearchhelp information. Update often!To check your AFNI version, copy+paste:
afni -ver
Purpose: Report this useful info whenever asking a question on the Message Board!
Note
The record of all changes (new options, new programs, bug fixes, et al.) in AFNI programs is maintained for all to see in the online AFNI History.
Footnotes
