1.1.8. macOS 12+ (Apple Silicon/ARM processor/chip: M1, M2, …)
Things to note before starting
These setup instructions are for macOS 12 or greater with Apple Silicon/ARM CPUs (not Intel chips).
Check processor chip type: To verify your OS processor, click on the Apple icon in the upper left of the screen -> “About this Mac”, and check the “Processor” or “Chip” type listed.
Each step involves copy+pasting text into a terminal (the Terminal app, which can be found via the Finder). In some cases, clicking/typing in an app is necessary, as well as rebooting the computer for changes to take effect.
If you need to know your shell type, copy+paste
echo $0.
Quick setup for general users
This section describes primary installation instructions for general users, and it is assumed that you have administrative/sudo privileges on your macOS computer:
Copy+paste the following to get download scripts:
cd
curl -O https://raw.githubusercontent.com/afni/afni/master/src/other_builds/OS_notes.macos_12_ARM_a_admin_pt1.zsh
curl -O https://raw.githubusercontent.com/afni/afni/master/src/other_builds/OS_notes.macos_12_ARM_a_admin_pt2.zsh
curl -O https://raw.githubusercontent.com/afni/afni/master/src/other_builds/OS_notes.macos_12_ARM_b_user.tcsh
Copy+paste the following to run the first admin-level install script (which will ask you to enter your administrator password, twice (once early, once later)):
zsh OS_notes.macos_12_ARM_a_admin_pt1.zsh
Copy+paste the following to run the second admin-level install script (which will ask you to enter your administrator password):
zsh OS_notes.macos_12_ARM_a_admin_pt2.zsh
Reboot the computer (for the changes to take effect).
Copy+paste the following to run the user-level install script (no password required):
tcsh OS_notes.macos_12_ARM_b_user.tcsh
To get additional Python libraries used in AFNI, it currently appears most efficient on macOS to use conda (e.g., Miniconda or Anaconda). Quick Miniconda Setup instructions are provided, with the necessary set of Python libraries provided for an environment (e.g., in “environment_ex1.yml”). These could be added to an existing environment, or used to create a new one.
Quick setup for NIMH-administered computers
This section describes primary installation instructions for the special case of having a macOS computer administered by NIMH (NIH, USA), where the user does not have admin privileges:
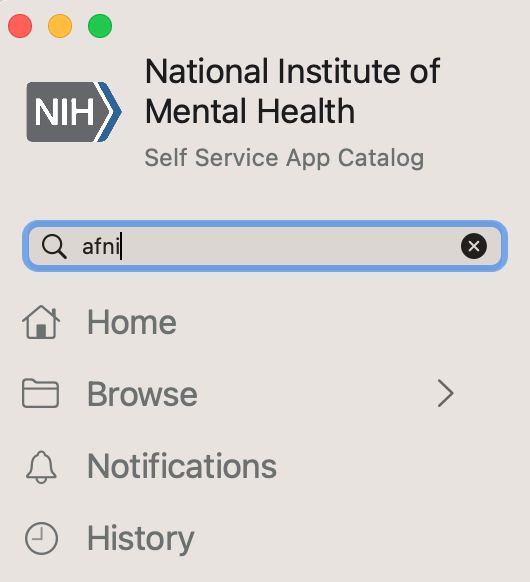
Use the NIMH Self Service application to install the dependencies needed by AFNI (PIV-card required):
Open the NIMH Self Service App on the Mac
Type AFNI in the search bar:
Click “Install” for “AFNI Dependencies”:
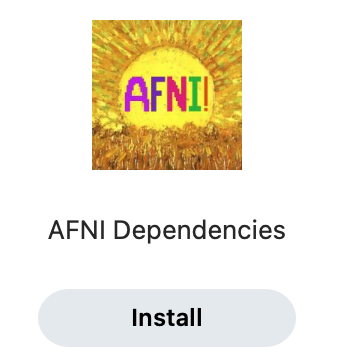
NB: The App may take an hour or so to run.
Thanks to the NIMH Mac Engineering team for helping to set this set of instructions up.
Copy+paste the following to get a download script:
cd
curl -O https://raw.githubusercontent.com/afni/afni/master/src/other_builds/OS_notes.macos_12_ARM_b_user.tcsh
Copy+paste the following to run the user-level install script (no password required):
tcsh OS_notes.macos_12_ARM_b_user.tcsh
To get additional Python libraries used in AFNI, it currently appears most efficient on macOS to use conda (e.g., Miniconda or Anaconda). No administrator password is needed for this. Quick Miniconda Setup instructions are provided, with the necessary set of Python libraries provided for an environment (e.g., in “environment_ex1.yml”). These could be added to an existing environment, or used to create a new one. NB: this should be done after AFNI binaries have been compiled.
Setup Python (a method)
AFNI has a small number Python requirements, like Numpy, Matplotlib, flask and flask_cors.
You can use any method to install+manage Python and its dependencies. In fact, your OS might have all the Python+modules needed to run AFNI already. Check this by running:
afni_system_check.py -check_all
... and check for any notes in the “Please fix” section at the end. If there are none about Python, then you are all set!
But if you still need to install some Python modules, you might consider using Miniconda. It is a convenient, cross-platform way to setup Python (and other packages) and manage environments. If you want to use it or learn more, check out this tutorial for both quick and detailed instructions. We have tutorial notes here for both installing Miniconda and using it to get the necessary Python libraries for AFNI.
Install Bootcamp demo data
The AFNI Bootcamp involves hands-on learning with processing and looking at data. The packages installed here include the data, handouts and useful “cheat sheets” of commands. The full download size is several GB, and you should leave at least 10 GB free on your computer after downloading+unpacking the data, to be able to run various examples.
Copy+paste (to download+unpack Bootcamp data to your home directory; note that this will overwrite any pre-existing Bootcamp directories):
cd
install_bootcamp_data.tcsh -do_install yes
If you want to remove the compressed packages that were downloaded, you can also delete theafni_boot_packages/directory.- !Pro tip!: Bring a computer mouse to use at the Bootcamp. It is muuuuch easier to follow the demos that way.
Read+practice the handy Unix documentation/tutorial. This will give you a quick lesson/refresher on using basic Linux shell commands (e.g.,
ls,cd,less, etc.). It will greatly enhance your bootcamp experience– we promise!
Evaluate setup/system (important!)
Open a new terminal, and copy+paste:
afni_system_check.py -check_all
- Read the “Please Fix” section at the end. If there are no suggestions, then rejoice! Otherwise, try the suggestion(s) there.
Open up the AFNI and SUMA GUIs, juuuust to make sure all is well:
afni
suma
Report any crashes or problems!
If stuck, then …
try searching online with the error message, and/or ask on the Message Board
send the system check to an AFNI guru for advice—copy+paste:
afni_system_check.py -check_all > out.ASC.txt
... and email the file “out.ASC.txt”.
How to keep up-to-date (remember!)
To update your AFNI sometime, copy+paste:
@update.afni.binaries -d
That’s it!!
Purpose: This will automatically download the correct, latest AFNI version to your computer, replacing your old binaries. It will also update the
apearchhelp information. Update often!To check your AFNI version, copy+paste:
afni -ver
Purpose: Report this useful info whenever asking a question on the Message Board!
Note
The record of all changes (new options, new programs, bug fixes, et al.) in AFNI programs is maintained for all to see in the online AFNI History.
Optional Extras
Setup terminal (opt)
Copy+paste:
defaults write org.macosforge.xquartz.X11 wm_ffm -bool true
defaults write org.x.X11 wm_ffm -bool true
defaults write com.apple.Terminal FocusFollowsMouse -string YES
Purpose: This sets the policy where “focus follows mouse” for relevant applications. After this, clicks on a new window are directly applied, without needing to “pre-click” it. You’re welcome.
Enable more SUMA keypresses (recommended)
Symbol |
Abbrev |
Name |
|---|---|---|

|
cmd |
command |

|
opt (or alt) |
option (or alt) |

|
shift |
shift |

|
ctrl |
control |

|
left, up, down, right |
left arrow, up arrow, down arrow, right arrow |
Some of Mac’s default keyboard shortcuts hijack basic SUMA GUI keypresses. You can unset those from the Mac list, and therefore use them in SUMA.
Click your way to “System Preferences” -> “Keyboard” -> “Shortcuts”.
In the “Mission Control” tab, change or deselect:
ctrl+up,ctrl+down,ctrl+left,ctrl+rightF10
Other key combinations to leave free include:
shiftplus any arrowsctrl+shiftplus any arrowsctrl+r,ctrl+s,ctrl+h,ctrl+n